A Stitch in Time

Complex capital goods deteriorate during their operation. In order to achieve the goal of restoring as many as parts of goods as possible, the Collaborative Research Centre (CRC) 871 is doing a research in condition-based regeneration of complex capital goods.
In the course of Industry 4.0, permanent condition monitoring is a major goal, especially for valuable and complex capital goods. Examples of such complex capital goods are jet engines, railway vehicles and wind turbines. In contrast to the condition-based monitoring is the current manual repair of these components. It is dependent on the subjective assessment of the processing employee and thus on his training and experience. To change that, basic research in the involved field of engineering and economics is necessary. The Collaborative Research Centre (CRC) 871 is doing a research to achieve exactly this. Experts from production engineering, fluid dynamics, structure simulation and economic sciences are combining their knowledge. For an exemplary application of the developed regeneration process, a high-pressure turbine blade of a civil jet engine is used.
Reaping Repair Benefits
In the industry, these blades are inspected by skilled employees and the damage is categorized according to a manual wherein all damages are listed with the limit values for each type. If a damage exceeds the limit, the blade is considered to be not repairable and is declared ‘scrap’. If otherwise, position of the damages is marked with a pen and the blade is handed to the machining area. Dents and other smaller damages are polished out. If the material, for example, on the tip is missing, it is welded on. After that, the blade is re-contoured using rotary tools and belt grinders. Due to all the manual processes, the quality of repair highly depends on the worker. The automation in such an industrial maintenance, repair and overhaul (MRO) process is low. Since the processes have different processing times, they are not arranged in a line, but rather in cells with varying number of machines or work places for different processes. During the whole repair process, there is no information on how the repair benefits the performance or lifetime of the goods. To change this and to better focus the repair measures on the performance or lifetime limiting damages, a condition-based regeneration is necessary.

Making it Industry - Ready
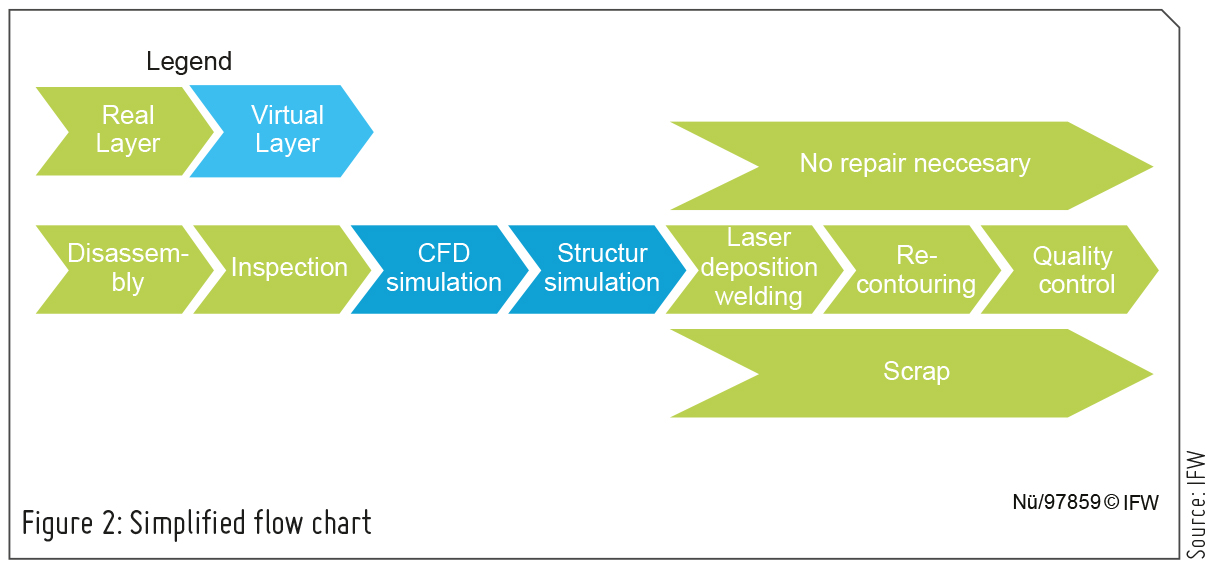
As a 'proof-of-concept', research from different institutes is combined in a process chain for the condition-based regeneration, as it can be seen in Figure 1. Besides the research of the interfaces between the different technologies, the process chain is used as a demonstrator. The aim is to transfer the research into the industry. To fully automate the regeneration, the individual process cells are connected with a mobile handling system (MHS). It consists of the MIR200 from Mobile Industrial Robots and the UR10e from Universal Robots and an electric gripper from Zimmer Group. Due to integrated sensors, the MHS can avoid obstacles and can collaborate with humans. The UR10e is also equipped with sensors so the whole system can operate without fences. Thus, the process chain can be flexibly extended by further process cells and the workpiece can run through the repair process in any order. The whole process chain is divided in two layers, a real and a virtual layer, as it can be seen in Figure 2.
The process chain starts in the real layer with a gentle disassembly of the turbine blade. With a piezo-driven tool, the necessary force can be reduced to minimize the wear of the blade. After the disassembly, the blade is transferred for the inspection. It is checked non-destructively for cracks. If no unrepairable crack is detected, the blade is digitized using an optical measurement system. This process cell is the interface between the real and virtual layer. First, the whole blade is measured and digitized into a point cloud (STL). After that, areas of interest are scanned with a higher resolution. These areas are then combined with the point cloud. The digitized blade is the base for a digital workpiece twin. It is used to connect the real with the virtual layer and store all data. In addition to the geometry data, the type and position of the damage, simulation results and customer requirements, for example, are also stored here.
Further analysis of the digitized blade is done within the virtual layer. There, the condition of the blade is acquired. The performance of the blade is determined by aerodynamic simulations. Due to high computing time, this is done in advance. A tool called 'ASTOR' combines the results of the simulations and calculates the performance of a blade in seconds. A similar tool is used for the structural simulation. This can calculate an estimation of the remaining lifetime of the blade. Previously, the simulations were only used for product development. With the results, the damages can be repaired in the real layer. The first goal is to automatically repair the tip. Therefore, a new geometry of the blade is generated and the tip is prepared in the real layer.
For adding material, a laser deposition welding cell with 5-axis is used. Different materials can be used depending on the type of the blade. In case of the high-pressure turbine blade, a nickel base alloy is used. This process is not accurate enough for the aerodynamic requirements. Therefore, a re-contouring process follows the additive process. With a 5-axis mill, the geometry of the blade is restored. Through a redundant axis in the machine tool, the deformation of the blade is compensated. After a final quality control, the geometry is measured and the blade is inspected for cracks to ensure the quality. This geometry can be simulated again to get the performance and lifetime increase. With this information, the overhaul process can be improved. The whole process chain can also be continuously updated with new repair methods and process cells. The first display of this system demonstrator will be in November 2020, after which it will be available for presentations by the interested parties from the industry and the research for another year.
The first display of this system demonstrator will be in November 2020, after which it will be available for presentations by the interested parties from the industry and the research for another year.

PROF DR.-ING B DENKENA
Head of the Institute of Production Engineering and Machine Tools (IFW)
Leibniz University, Hannover

DR.-ING B BERGMANN
Head of the Department - “Machine and Controls”
IFW, Leibniz University, Hannover


 Facebook
.png) Twitter
Twitter Linkedin
 Subscribe